Magento 2 – Mastercard Payment Gateway Services
Magento 2 – Mastercard Payment Gateway Services


Hosted Payment Session Configuration

- Enabled: Click on the dropdown and select ‘Yes’ to enable the Hosted Payment Session configuration.
- Vault Enabled: When enabled, the payment method is securely stored in the Vault, with all information encrypted by the Mastercard gateway and linked to a unique payment method token. This token allows you to process transactions without the need for handling unencrypted data, thereby reducing the PCI compliance requirements.
- Title: Enter the text that needs to be displayed in the front-end checkout page/payment method section.
- Payment Action: There are 3 payment actions (payment flow methods) under Hosted Payment Session integration:
- Authorize and Capture
If you select ‘Payment Action’ as Authorize and Capture, then the transaction will be done automatically. After the user has entered card details and submitted an order, the amount of the total order will be deducted from the user’s card and will be automatically transferred to the merchant’s account. It may take some time to reflect the amount into the merchant’s account, but the process will be automatic. - Authorize Only
If you select ‘Payment Action’ as Authorize Only, the merchant should manually process the transactions and accept the payment amount. The manual process of capturing funds can be done via the Backend and will be covered later in the document. The Authorize Only payment method involves two-stage processing, where authorization is obtained during the checkout process, but funds are not deducted until the order status is set by the merchant to Invoice.
- When either of the above options are selected, an additional field, Add Token to Order, will be available.

-
-
- Add Token to Order: If set to “Yes,” the received payment token will be stored at the order level and will be accessible via REST API after the customer places the order.
-
- 3. Verify and Add Token to Order (VATO):
- When this option is selected, the Add Token to Order field will disappear.
- VATO: If the Payment Action is set to “Verify and Add Token,” the payment token will be stored at the order level and will be accessible via REST API. There will be no 3DS option for this payment method.
These configurations ensure that the appropriate tokenization and verification processes are applied based on the selected Payment Action.
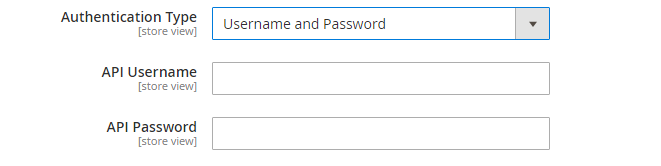
- Authentication Type: Select Username and Password
- API Username: Enter your API username. Please refer below to obtain the API Password.
- API Password: Enter the API password from your merchant account.
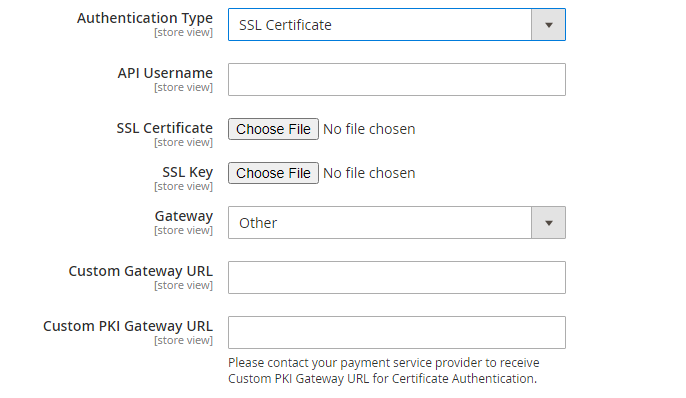
Instead of UserName and Password, an SSL certificate can be used. When this option is selected under Authentication Type, the admin panel will need to submit the following information:
- API Username
- SSL Certificate
- SSL Key
- Custom PKI Gateway URL: You will need to contact your payment service provider/bank to receive Custom PKI Gateway URL for Certificate Authentication.
- A Certificate Authority (CA) approved by MasterCard must issue the SSL Certificate. Please get in touch with Mastercard to get a list of approved CAs.
- You can refer to the Documentation to understand the requirement of SSL Certificate Authentication and what things you need to take care of.
- Gateway: Select the gateway based on your account region.
- Custom Gateway URL: This field will be displayed if the Gateway is set to “Other,” and it will override the Gateway region.
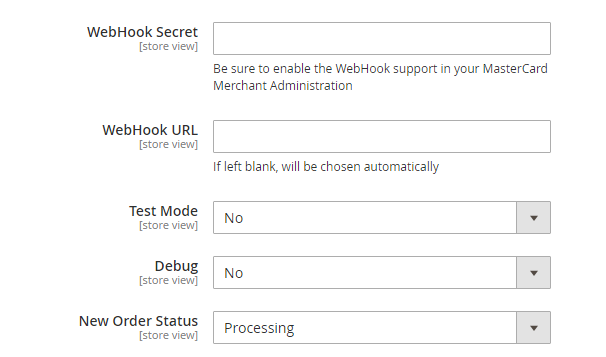
- WebHook Secret: Enter your webhook secret from your merchant account. Please refer below to obtain the WebHook Secret.
- WebHook URL: Enter your webhook URL from your merchant account.
- Test Mode: Select ‘Yes’ to configure your Merchant credentials to Test mode. In Test mode, you can check if the payment transactions are working correctly. Select ‘No’ if you want to switch to Live mode. It is possible to add credentials for the test and live mode simultaneously. Both modes have their own set of credential fields, which you need to fill separately. It allows you to switch between modes without re-entering your credentials every time.
- We highly recommend you to configure your Merchant credentials in TEST mode beforehand and make sure that everything works.
- Select ‘Yes’ to submit transactions using test credentials, prefixing TEST in front of the API Username.
- Select ‘No’ to submit transactions using the PRODUCTION credentials.
- Debug: Select ‘Yes’ to enable the merchant’s logging. Debug logging only works in Test mode. If you enable the Debug setting, it provides the additional output in the Magento extension for payment processes.
- New Order Status: Select the status of any new order processed within the Magento Platform. Changing this field will not affect how the gateway processes the transaction. Three options are available: Payment Verified, Processing or Suspected Fraud.
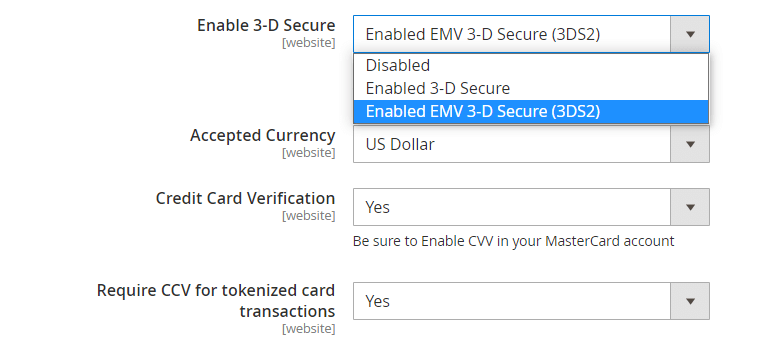
- Enable 3-D: Select the security level of the user’s card.
- You can select either:
- Disabled – The order will be placed after the order and entered card details have been verified.
- 3-D Secure – This security level allows payers to authenticate their issuer’s Access Control Server (ACS) by entering a password previously registered with their card issuer. Supported authentication schemes include Mastercard SecureCode™, Verified by Visa™, American Express SafeKey™, J/Secure™, and Diners Club ProtectBuy™.
EMV 3-D Secure (3DS2) – This security level is the new version designed to enhance security in online purchases while providing frictionless checkouts to payers who are considered low-risk by the Access Control Server (ACS). The ACS may determine the risk using the information provided by the merchant, browser fingerprinting, and/or previous interactions with the payer. The ACS subjects the payer to a challenge (for example, entering a PIN) only where additional verification is required to authenticate the payer, thereby providing increased conversion rates. Supported authentication schemes include Mastercard SecureCode™, Verified by Visa™, American Express SafeKey™, Diners Club/Discover ProtectBuy, and JCB J/Secure.
- Accepted Currency: Select the base currency of the store.
- Credit Card Verification: Select ‘Yes’ to make the credit card verification required on the Hosted Session workspace
- Require CCV for tokenized card transactions: Select ‘Yes’ to enable credit card verification for saved cards.
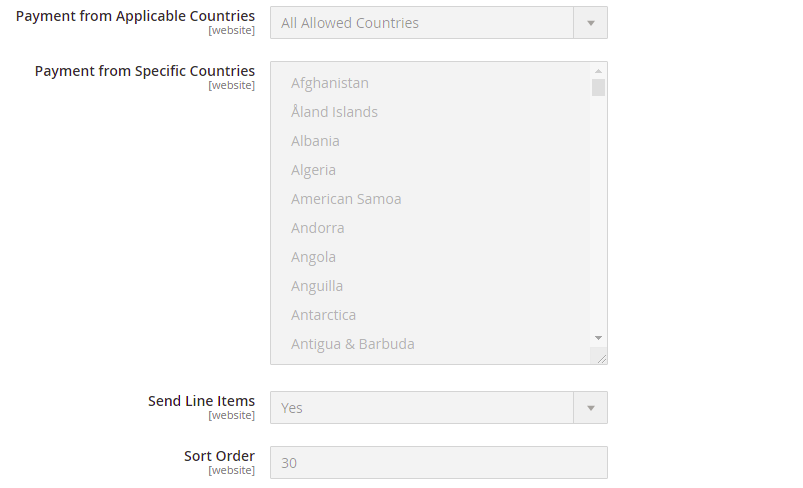
- Payment from Applicable Countries: The merchant can select the countries from which the payment can be processed (separate from any blocking enabled via Merchant Manager). Two options are available: All Allowed Countries, Specific Countries
- Payment from Specific Countries: Select the country from which the payment can be made. This will be enabled only if you have selected the ‘Payment from Applicable Countries’ as Specific Countries.
- Send Line Items: Select “Yes” to send the additional data to the Mastercard Gateway.
- Sort Order: Enter the sort order of the payment method. 0 is the highest priority.
Advanced Configuration
In the Advanced configuration section, you can find information about the current API version utilized by the Mastercard Payment gateway plugin. Additionally, there is a field available to Create Token Request Data, Authorize Request Data, Sale Request Data & Verify Request Data.